
5 Minute Overclock: Intel Core i9-13900K P-cores to 6500 MHz
SkatterBencher
- posted on
- No Comment

We’re overclocking the Core i9-13900K P-cores up to 6500 MHz in 5 minutes or less using the ASUS ROG Maximus Z790 Apex motherboard and the EK-Quantum Delta² TEC.
I’ll speed-run you through the BIOS settings and provide some notes and tips along the way. More than usual, I want to emphasize that this video is for entertainment only and not the whole picture. Please don’t outright copy these settings and apply them to your system. I strongly advise against even trying the settings unless you have this specific CPU, motherboard, and cooling combination. If you want to learn how to overclock this kind of system, please check out the longer SkatterBencher article.
Alright, let’s do this.
5 Minute Speed Run
When you’ve entered the BIOS, Go to the Advanced menu
Enter the CPU Configuration submenu. Since, for this video, we are exclusively focusing on P-core overclocking, we will disable the E-cores.
- Set Active Efficiency Cores to 0
Go to the Extreme Tweaker menu
Set AI Overclock Tuner to XMP II. This enables the use of the Intel Extreme Memory Profile 3.0 technology and will make the DDR5 memory run at its rated speed of DDR5-7200. Selecting XMP II means the motherboard will load the complete XMP profile.

Set BCLK Frequency to 100.15. That is a simple workaround in case the V/F Points (which we’ll configure later) don’t work correctly in combination with 100 MHz BCLK.
Set ASUS MultiCore Enhancement to Enabled – Remove All Limits. This will unleash the Turbo Boost 2.0 power limits and let the CPU run at unlimited power indefinitely.
Set DRAM Frequency to DDR5-7615MHz. This effectively overclocks the memory to DDR5-7600. Note that we retain the memory XMP timings because we selected XMP II earlier.
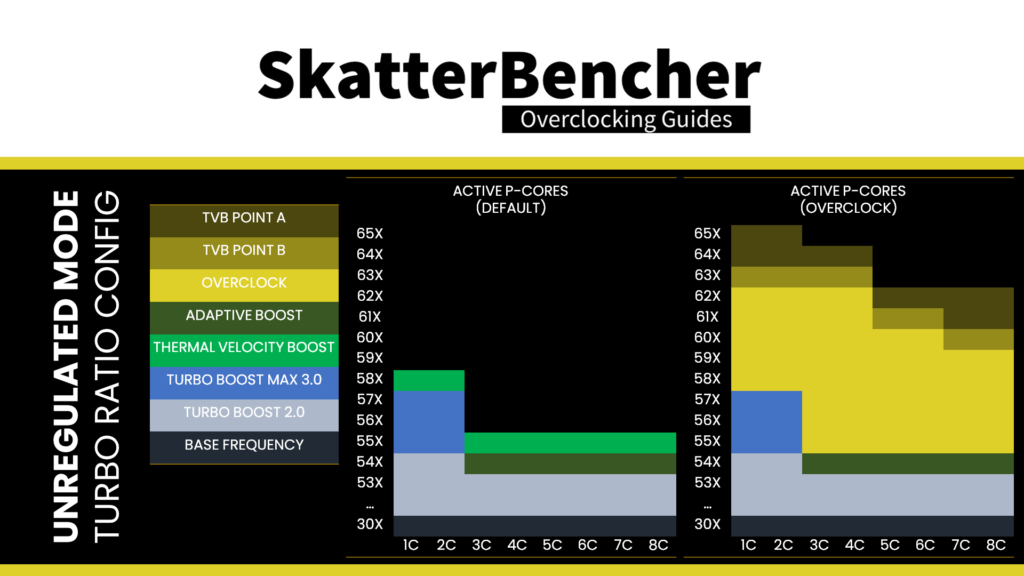
Set Performance Core Ratio to By Core Usage. This enables us to configure a dynamic P-core overclock as we can configure the maximum allowed P-core ratio for a given number of active P-cores.
- Set 1-Core and 2-Core Ratio Limit to 65
- Set 3-Core and 4-Core Ratio Limit to 64
- Set 5-Core to 8-Core Ratio Limit to 62
Enter the Specific Performance Core submenu. Here we can limit the maximum ratio for each P-core individually regardless of the By Core Usage configuration. We can also define the specific per P-core adaptive voltage for the specific P-core ratio limit.
- Set Performance Core0, Core1, Core3, Core4, Core5, and Core7 Specific Ratio Limit to 65
- Set Performance Core2 and Core6 Specific Ratio Limit to 64
- Set Performance Core2 and Core6 Specific Voltage to Adaptive Mode
- Set Offset Mode Sign to +
- Set Additional Turbo Mode CPU Core2 and Core6 Voltage to 1.5
Leave the Specific Performance Core submenu.
Enter the AVX Related Controls submenu. Now we can adjust the AVX negative ratio offset, which lowers the P-core ratio when using AVX. The Offset is referenced against the Per P-core Ratio Limit, which we just configured.
- Set AVX2 Ratio Offset to per-core Ratio Limit to User Specify
- Set AVX2 Ratio Offset to 6
Leave the AVX Related Controls submenu
Enter the DIGI+ VRM submenu. Here we can make changes to the voltage regulator configuration. We adjust the VRM loadline to minimize the Vdroop, which is the voltage drop when the CPU goes from idle to full load. We choose the VRM loadline with the smallest Vdroop, so the effective voltage deviates the least from our manually configured CPU voltage-frequency curve.

Set CPU Load-line Calibration to Level 8
Leave the DIGI+ VRM submenu
Enter the Internal CPU Power Management submenu
Set Regulate Frequency by above Threshold to Disabled. This prevents the CPU from reaching a maximum of 90 degrees Celsius and instead allows it to go to the Intel-specified TjMax of 100 degrees Celsius
Set IA AC Load Line to 0.01. This ensures the voltage requested by the CPU to the VRM controller does not differ from the configured voltage-frequency curve.
Leave the Internal CPU Power Management submenu
Enter the Thermal Velocity Boost submenu
Set Cache Dynamic OC Switcher to Enabled. This feature allows us to switch between low and high gear depending on the CPU current. We use it to limit the Ring frequency in all-core workloads to provide voltage headroom for the P-cores to boost to a higher frequency.
- Set Current Threshold to Switch to Low Cache Gear to 160
- Set Threads to Sleep for High Cache Gear to 0
- Set High Cache Ratio to 50
- Set Low Cache Ratio to 44

Set TVB Voltage Optimizations to Disabled. This prevents the CPU from automatically reducing the voltage based on its current temperature, as this may induce instability when manually tuning the voltage-frequency curve.
Set Overclocking TVB to Enabled. OCTVB allows us to limit the P-core frequency based on the CPU operating temperature. It is based on the Turbo Ratio configuration. For each number of active cores, we define two temperature points, each with a unique number of “down-bins’.
- Set 1-Core to 6-Core Active to Enabled
- For 1-Core and 2-Core Active, set Temperature A to 35
- For 3-Core to 8-Core Active, set Temperature A to 65
- For each Core Active, set Negative Ratio Offset A to User Specify
- For 1-Core, 2-Core, 7-Core, and 8-Core Active, set Ratio Offset A to 2
- For 3-Core to 6-Core Active, set Ratio Offset A to 1
- For 1-Core to 4-Core Active, set Temperature B to 80
- For 5-Core and 6-Core Active, set Temperature B to 85
- For 7-Core and 8-Core Active, set Temperature B to 90
- For the other Core Active, set Temperature B to 90
- For each Core Active, set Negative Ratio Offset B to User Specify
- For each Core Active, set Ratio Offset B to 1
Leave the Thermal Velocity Boost submenu.
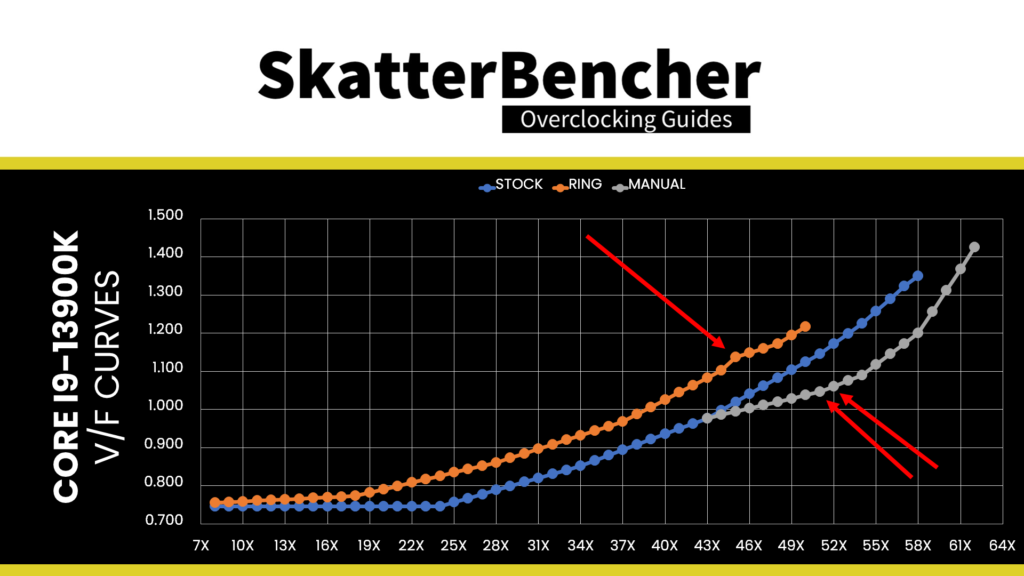
Enter the V/F Point Offset submenu. That gives access to Intel’s Advanced Voltage Offset feature, more commonly known as V/F Points. This feature extends the Adaptive Voltage mode by allowing end-users to undervolt or overvolt specific points of the CPU’s factory-fused voltage-frequency curve.
- Set Offset Mode Sign 6 to 10 to –
- Set V/F Point 6 to 0.100
- Set V/F Point 7 to 0.125
- Set V/F Point 8 to 0.135
- Set V/F Point 9 and 10 to 0.150
Leave the V/F Point Offset submenu
Set Global Core SVID Voltage to Adaptive Mode. This allows us to control the voltage associated with the highest point of the voltage-frequency curve. The adaptive voltage set maps to what’s called the OC Ratio. The OC Ratio is equal to the highest configured CPU ratio. In our case, that’s 65X. The voltage between 65X and the next V/F Point, 58X, is interpolated by the CPU.
- Set Offset Mode Sign to +
- Set Additional Turbo Mode CPU Core Voltage to 1.5
High DRAM Voltage Mode to Enabled. This enables memory voltage higher than 1.40V, which we need for our memory overclock
- Set DRAM VVD Voltage to 1.45
- Set DRAM VDDQ Voltage to 1.45
Then save and exit the BIOS. Ensure the Cryo Cooling mode is set to Unregulated in the operating system.
Core i9-13900K P-cores Overclock Performance Improvement
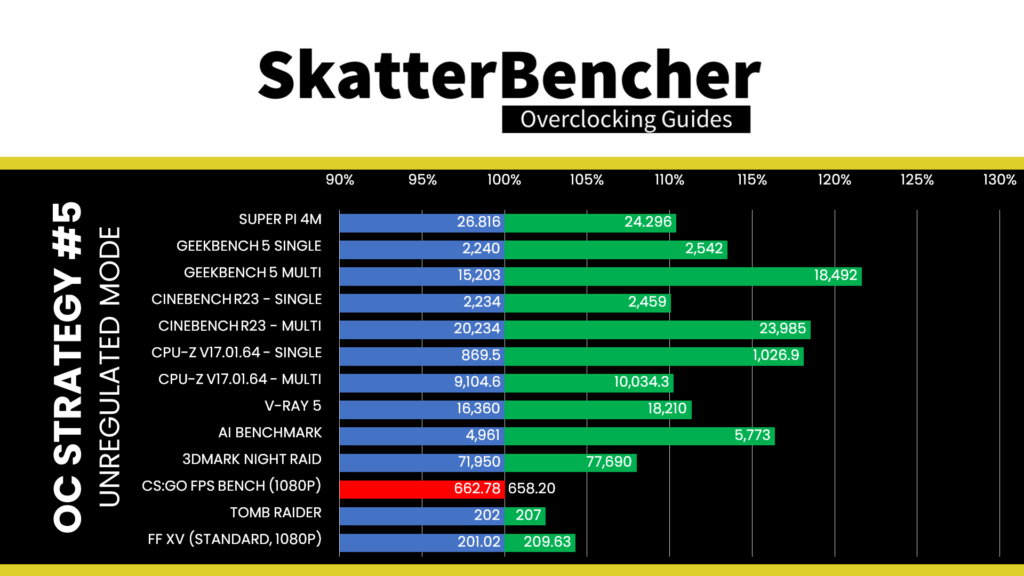
To ensure everything is working as intended, we re-run some benchmarks and check the performance increase compared to the default settings. Higher is better, and all are higher. We see a maximum performance increase of +21.75% in Geekbench 5 Single.
The highest Core Clock reported in the operating system is 6500 MHz for all P-cores except P-core P-core 2 and P-core 6.
When running Prime 95 Small FFTs with AVX disabled, the average CPU P-core clock is 5693 MHz with 1.200 volts. The average CPU temperature is 100 degrees Celsius. The water temperature is 32.9 degrees Celsius. The average CPU package power is 224.3 watts.

And that’s it, thanks for reading and see you next time!