
5 Minute Overclock: Intel Core i9-11980HK to 5200 MHz
SkatterBencher
- posted on
- No Comment

We’re overclocking the Core i9-11980HK Tiger Lake CPU up to 5200 MHz using an 尔英 (Ěr yīng) motherboard and EK custom loop water cooling.
I’ll speedrun you through the BIOS settings and provide some notes and tips along the way. Please note that this is for entertainment purposes only and not the whole picture. Please don’t outright copy these settings and apply them to your system. If you want to learn how to overclock this system, please check out the longer SkatterBencher blog post.
All right, let’s do this.
5 Minute Speedrun
When you’ve entered the BIOS,
Go to the Advanced menu
Enter the Power & Performance submenu. Here we can find the tools to remove the power and electrical limits constraining the CPU performance.
Enter the CPU – Power Management Control submenu.
Enter the View/Configure Turbo Options submenu. Here, we can manually set the Turbo Boost 2.0 CPU ratios and configure a dynamic CPU core overclock based on the number of active cores.
- Set 1-Core, 2-Core, and 3-Core Turbo Ratio Limit Ratio Override to 52
- Set 4-Core, 5-Core, and 6-Core Turbo Ratio Limit Ratio Override to 51
- Set 7-Core and 8-Core Turbo Ratio Limit Ratio Override to 50
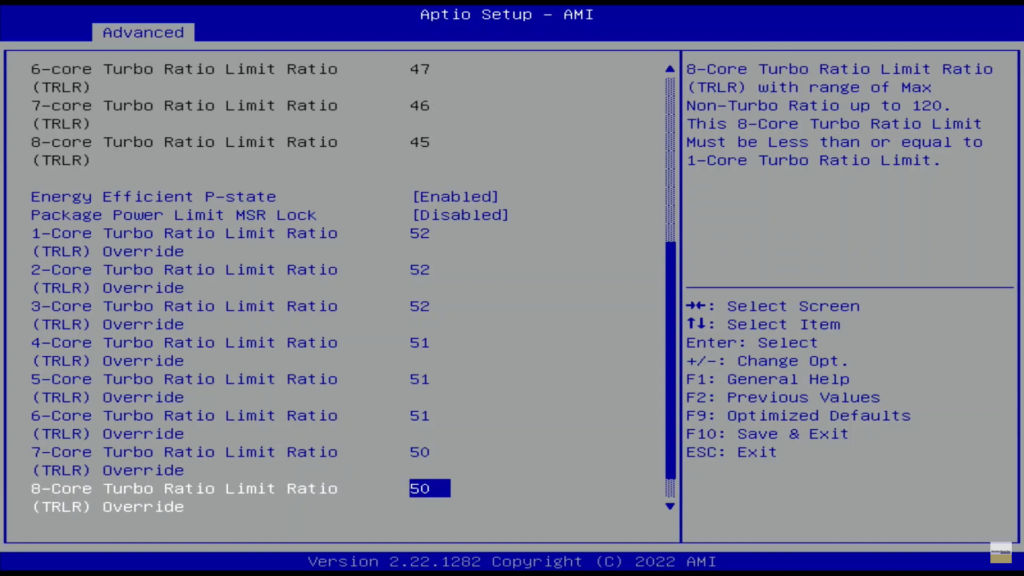
Leave the View/Configure Turbo Options submenu
Enter the Config TDP Configurations submenu. Here we can unleash the Turbo Boost 2.0 PL1 and PL2 power limits and let the CPU run at unlimited power indefinitely.
- Set Power Limit 1 to 4095875
- Set Power Limit 2 to 4095875
- Set Power Limit 1 Time Window to 128
Leave the Config TDP Configurations submenu
Enter the CPU VR Settings submenu. Here we can remove some of the electrical limits constraining the voltage regulator driving the CPU core voltage.
Enter the VccIn VR Settings submenu.
- Set VR Current Limit to 1023
- Set TDC Current Limit to 32767
Leave the VccIn VR Settings submenu
Leave the CPU VR Settings submenu
- Set Power Limit 4 Override to Enabled. This enables us to set a manual Turbo Boost 2.0 PL4 power limit.
- Set Power Limit 4 to 4095875
Enter the Power Limit 3 Settings submenu. Here we can configure the Turbo Boost 2.0 PL3 power limit.
- Set Power Limit 3 Override to Enabled
- Set Power Limit 3 to 4095875
- Set Power Limit 3 Time Window to 64
Leave the Power Limit 3 Settings submenu.
Enter the CPU Lock Configuration submenu. Here we can remove the locks that prevent overclocking settings from becoming effective. Without disabling the locks, overclocking won’t be possible.
- Set CFG Lock to Disabled
- Set Overclocking Lock to Disabled.
Leave the CPU Lock Configuration submenu
Leave the CPU – Power Management Control submenu
Leave the Power & Performance submenu
Enter the OverClocking Performance Menu. Here we find most tools from Intel’s CPU overclocking toolkit, enabling us to configure higher frequencies for the CPU.
- Set OverClocking Feature to Enabled. This, quite literally, enables overclocking.
- Set FIVR Faults to Disabled
- Set FIVR Efficiency to Disabled
- Set VccIn Max Limit to 2400
- Set VccIn Voltage Override to 2300
Enter the Processor submenu. In this menu, we program the “OC Ratio,” the adaptive voltage for the “OC Ratio,” and the maximum allowed ratio for each core.
- Set Per Core Ratio Override to Enabled
- Set Core Max OC Ratio to 52
- Set Core 0, 2, 3, 4, 5, 6, and 7 Max Ratio to 52
- Set Core 1 Max Ratio to 51
- Set Core Voltage Mode to Adaptive.
- Set Core Extra Turbo Voltage to 1430.
Leave the Processor submenu
Leave the OverClocking Performance Menu
Go to the Chipset menu
Enter the System Agent (SA) Configuration submenu. The System Agent contains the memory controller which drives the DDR4 memory, so here we can configure our memory overclock.
Enter the Memory Configuration submenu.
Enter the Memory submenu. We don’t enable the XMP profile directly since the maximum stable frequency for this CPU is only DDR4-4000, and our kit is rated at DDR4-4266. However, we copy the XMP memory timings and voltage to set a custom profile.
- Set Memory Profile to Custom profile
- Set Memory Reference Clock to 133
- Set Memory Ratio to 30. This, multiplied by the 133 MHz reference clock, results in a memory frequency of DDR4-4000
- Set tCL to 19
- Set tRCD/tRP to 19
- Set tRAS to 39
- Set tCWL to 20
- Set tFAW to 51
- Set tREF1 to 16381
- Set tRFC to 735
- Set tRRD to 0
- Set tRTP to 12
- Set tWR to 24
- Set Memory Voltage to 1.40 Volts
Then save and exit the BIOS.
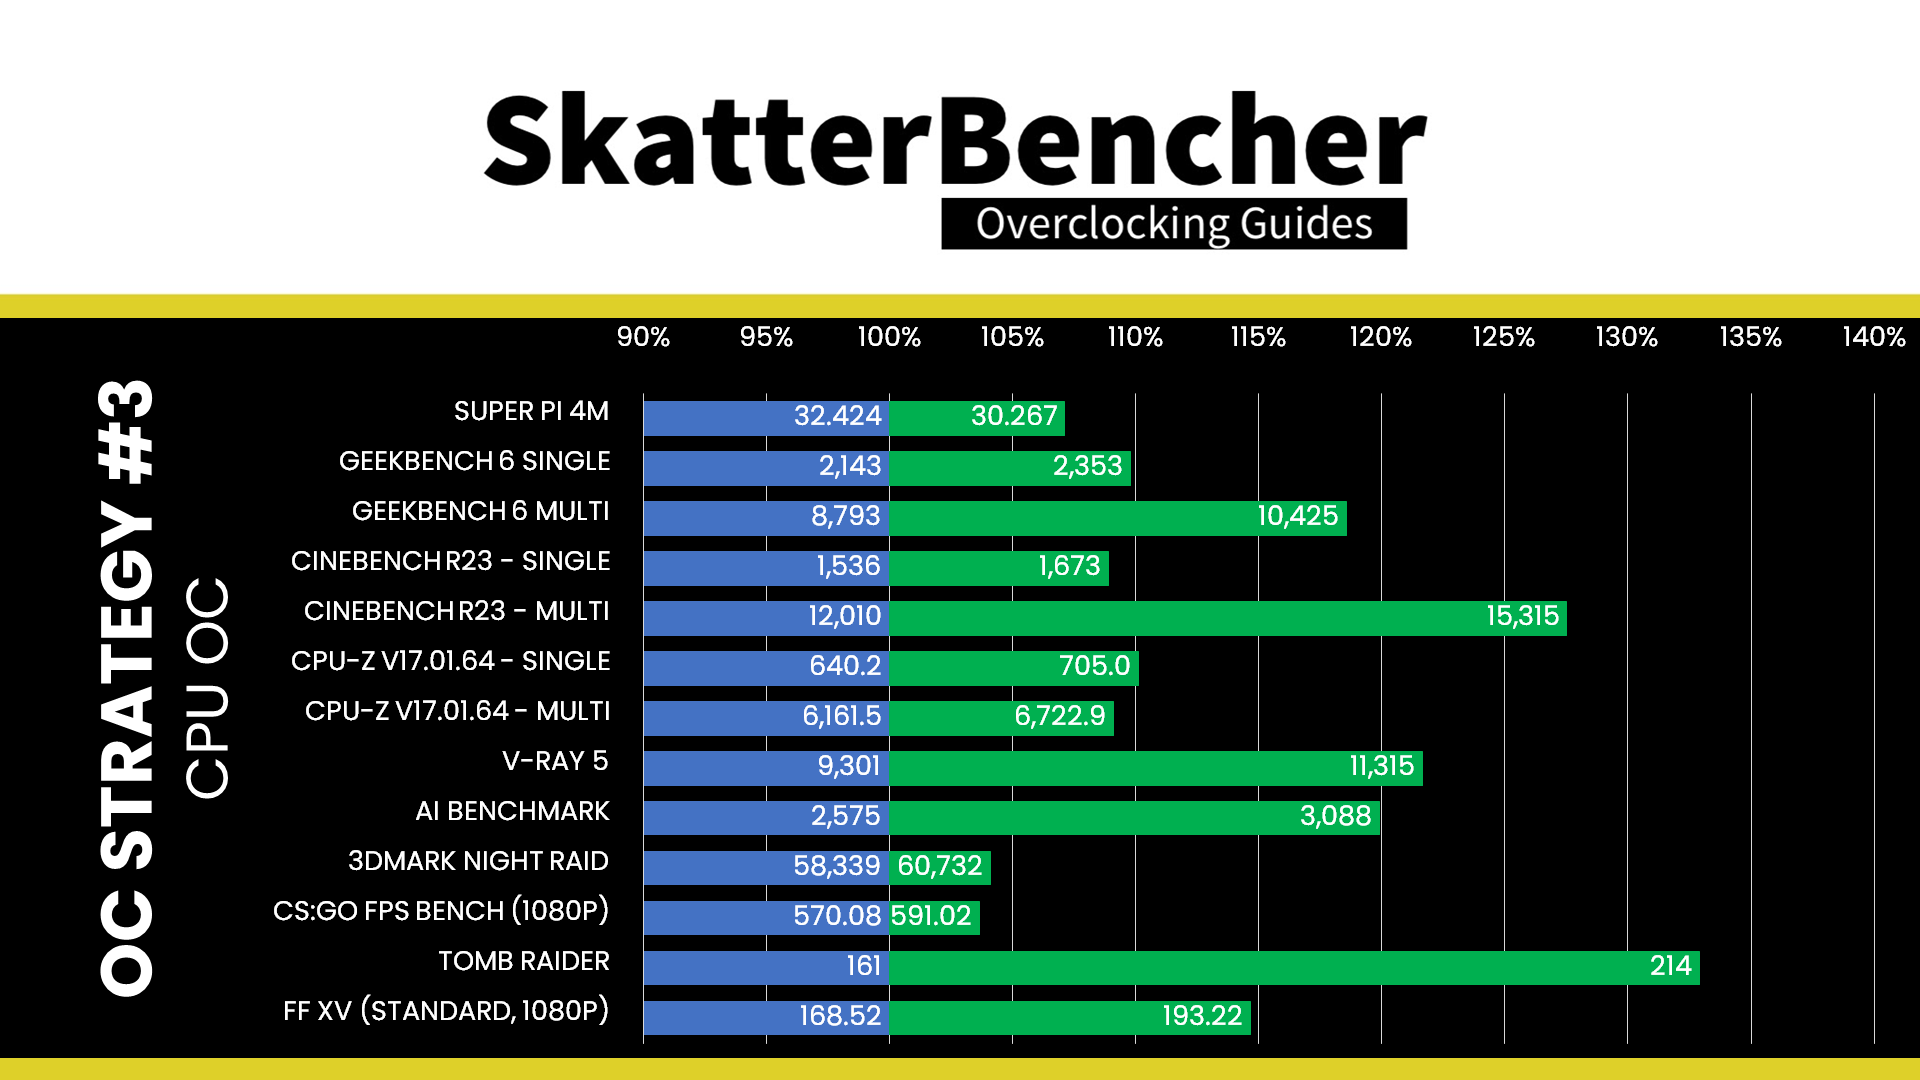
Core i9-11980HK Overclock Performance Improvement
We re-run some benchmarks to ensure everything works as intended and check the performance increase compared to the default settings. Higher is better, and all are higher. We see a maximum performance increase of +32.92% in Tomb Raider.
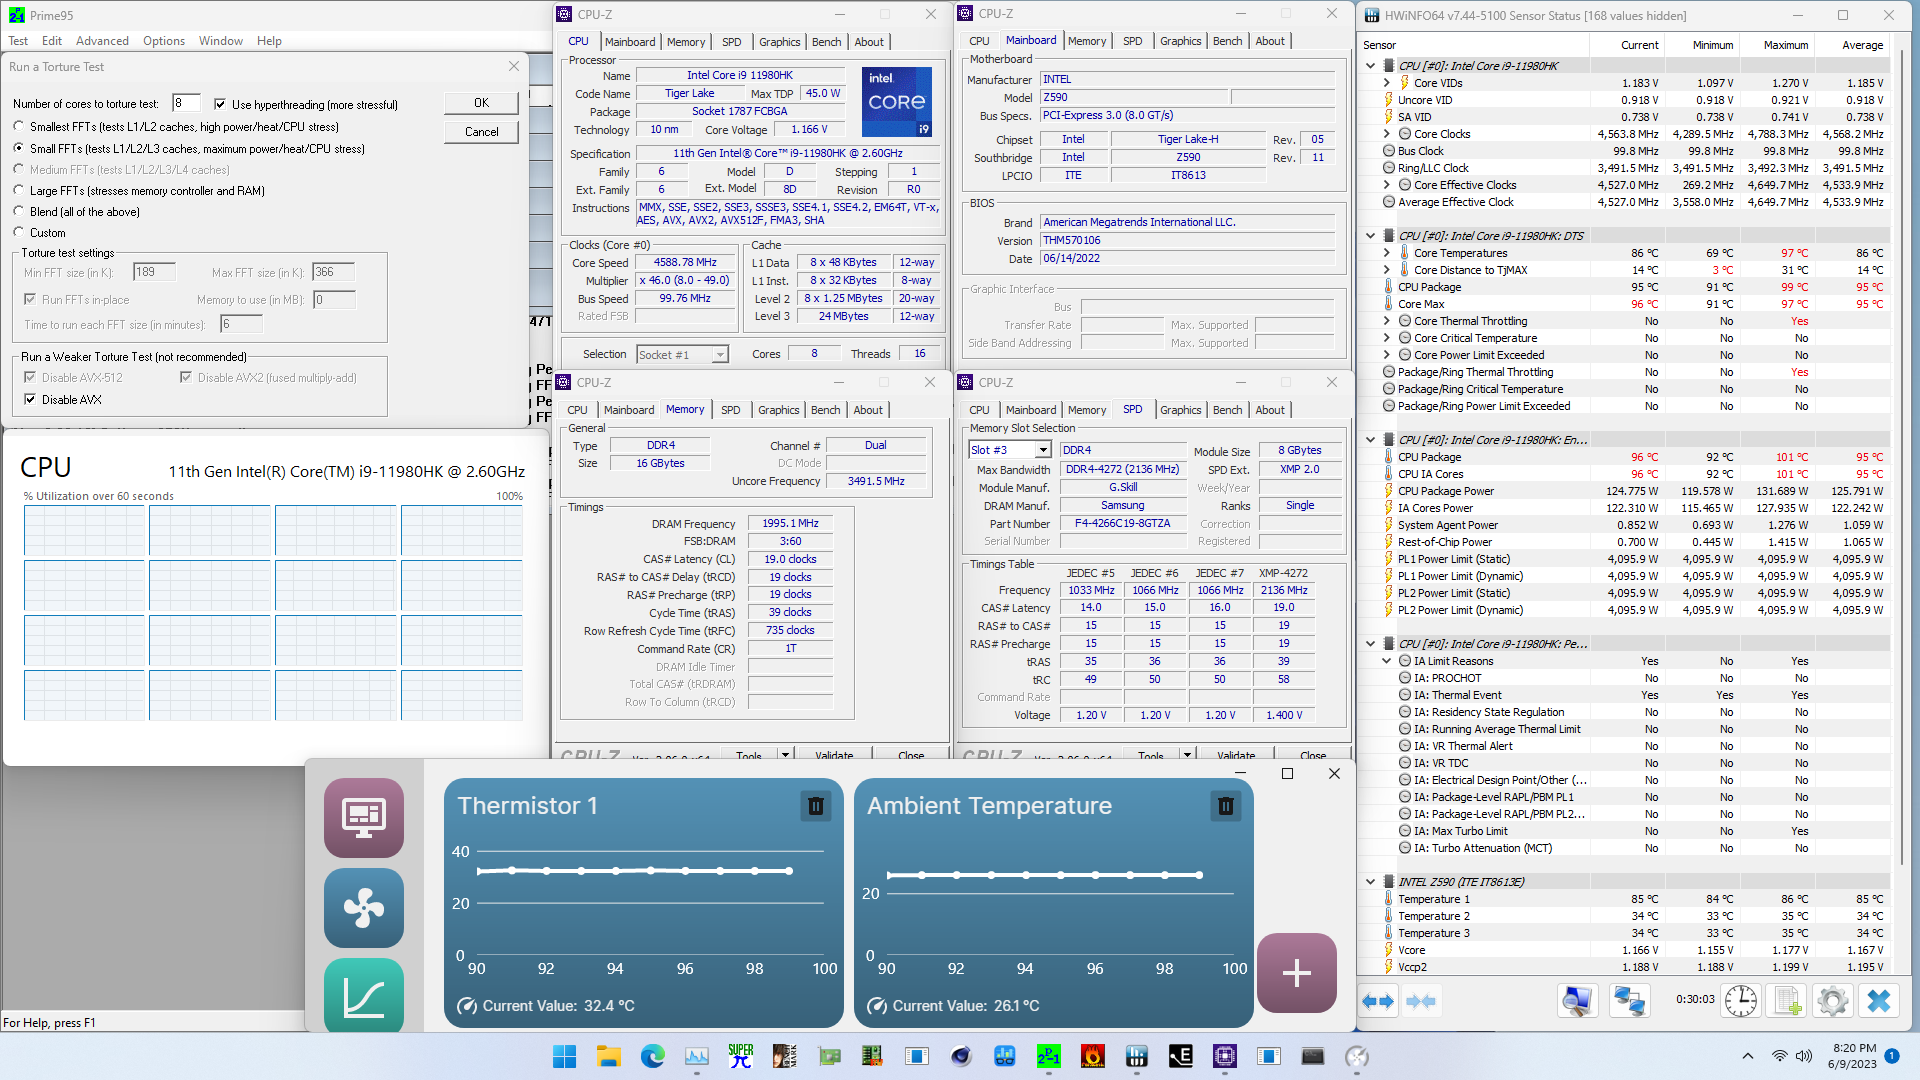
The highest Core Clock reported in the operating system is 5200 MHz.

When running Prime 95 Small FFTs with AVX disabled, the average CPU core clock is 4568 MHz with 1.185 volts. The average CPU temperature is 95 degrees Celsius. The ambient and water temperature is 26.1 and 32.4 degrees Celsius. The average CPU package power is 125.8 watts.
And that’s it. I thank you for watching and the Patreons for the support. See you next time!